Showing posts with label tutorial. Show all posts

June 25, 2012

::How to Organize Embroidery Floss::

I love, love, love hand sewing.  I like quilting and binding by hand, making my little hexies and now embroidering too.

My embroidery thread is a hot mess and I spend more time searching through the pile of thread as opposed to actual sewing.

Here's how you corral your floss in a nice, neat organized stash.


Head on over to Joann Fabrics and don't forget your coupon!

Purchase the following products:
*note that I used DMC brand*
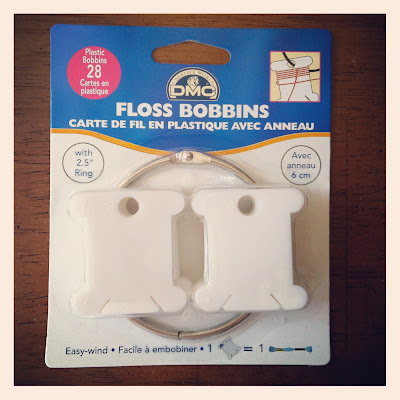
Floss bobbins


Floss Number Stickers


DMC Floss

Put your empty bobbins on the ring.


Pull the two wrappers off the floss,
but don't throw them away yet!


Take the end of the floss and thread it through
one of the small slits at the bottom.
I thread it through two or three times wrapping
around the rounded corners
for extra security.

Wrap the entire package of floss 
around the mid-section of the bobbin
and pull the end of the thread through
the other slit.
I wrap two or three times here as well.


Remember how I said not to throw the wrappers away?
Find your wrapper and look for the color number 
next to the bar code.
(It's usually a three digit number.)
Open your package of floss number stickers and 
look for the coordinating sticker.
Place sticker in the top right corner where you find
No.____

I'm just getting started!

I do have floss that isn't DMC brand
and I still put it on the bobbins,
they just aren't organized by number.

Here are the needles I use.


Hand embroidery adds a sweet touch to 
almost anything! It's a fun way to personalize
with a child's name or a favorite quote.


Visit DMC for a list of all the colors they make.

You can purchase embroidery designs but personally
I just make up my own and draw it lightly in pencil.

I highly recommend that you watch this video 
to learn the basic stitches and to see how some 
of the tools are used.


Enjoy

Photobucket

July 6, 2011

How To Comment on Our Blog

Court's comin'. Court's comin.  Yeah, that's right--Court is coming to visit!!  
She's en route as I type this. We are so psyched. 

And speaking of friends and family.....

Any of you out there who read our blog and lurk but don't comment--we really, REALLY want to hear from you. 
Mimi, are you out there??  We reallllly want you to comment.
Makes us feel good. Strokes our ego. Keeps us motivated to keep on keepin' on. 
knowwhatimean?

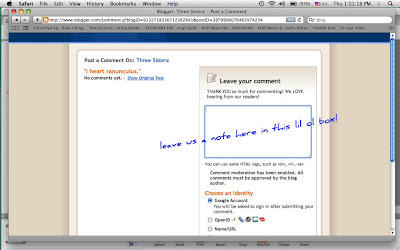
Well today is your day. Here is a little teeny tiny tute (blogger language for tutorial) on how.to.comment. 

First, start by scrolling down to the bottom of the blog post on which you want to comment.


Click on "Leave us a comment."
Real easy here, folks.


Okay, see that box screaming for you to type in it?  Yup, that's the one.
Go ahead and write what you think in there.


Next, you have a few choices as to how you will identify yourself or not at all, of course.


Bam. Done.  Took you 5 seconds, right?
Now it'll take a little bit for the comment to be published.
We'll receive it, then publish it and then it will show up. 

Seriously, though, we love to hear from our readers.  We know you are out there and we soooooo appreciate you reading. Hopefully this will help you out!!

April 7, 2011

::TUTORIAL:: Drop Cloth Pillow with Grosgrain Ribbon Ties

We are so excited to be guest posting for Tracie over @ Cleverly Inspired today! We love Tracie's work and are honored to be filling in while she is on spring break. Today we're going to show you how we made this super easy, super cute drop cloth pillow.


This pillow was originally part of my bedroom re-do that we did a few weeks back. Court loved them so much that we decided to recreate one for her family room.

Supplies:


--painter's drop cloth (Home Depot--6x9 was about $10)
--painter's tape
--fabric paint (we got ours @ Michael's)
--paint brush
--12" x 16" pillow insert (we got ours @ Jo-Ann's)
--4 pieces of grosgrain ribbon, cut to 13" long

This project involves three steps: Prep Work, Painting & Sewing.

::PREP WORK::
1. Wash and dry drop cloth to soften it. Iron.
2. Cut a piece that measures approximately 13" x 34".
3. Lay it on a flat surface that is protected since you will be painting.

::PAINTING::
1. Cut three pieces of painter's tape that are all roughly 16 inches long.
2. On one side, measure in four inches. Lay one piece of tape from top to bottom and press to secure it to flat surface. The paint does tend to bleed a little bit, but we liked that that gave it an imperfect, vintage feel.


3. Measure in one inch and lay second piece of tape. Press to secure.


4. Measure in another one inch and lay third piece of tape. Press to secure.
**We added two more pieces of tape, but you can stop at 3.**


5. Paint between pieces of tape. Remove tape immediately.


6. Allow four hours to dry before sewing. Allow another 72 hours before washing.


::SEWING::
The sewing of this project involves hemming the edges, attaching four ribbon ties and sewing pillow sides together.

1. Start on the end of the cloth that is closest to the paint stripes. Fold in 1/2" and iron.


2. Fold in another 1/2" and iron.


3. Place one grosgrain ribbon strip three inches from the edge of cloth along the ironed hem and pin place.


Repeat on the other edge.


4. Sew the hem closed using 1/4" seam making sure to include ribbon ties.


Feel free to sew a second stitch across ribbons to secure even more.


5. Repeat steps 1-5 on the other short end so that both short ends now have a finished hem with ribbons/ties attached.

6. Fold cloth right sides together lining up short ends and ribbons.


7. Pin the long sides together and sew a 1/4" seam taking care to backstitch at start and end.


8. Do a zig zag stitch to avoid fraying.


9. Turn pillow case right side out. Insert pillow form and tie ribbons closed.
*Use fray check to ends of ribbon to avoid fraying.*

Ba...da....BING!


Super cute, right? It is cute on its own or paired with other pillows!


Here is the little red striped one Molly & I made for the bedroom re-do.


It is such an easy, simple pillow to make and so versatile. You could make different sizes, applique it, make with fabric, etc. The options are endless!


March 21, 2011

::Tutorial:: Quickie Stenciled Onesies

Looking for some cute onesies for your bebe or for a gift?  Here you go, friends.
We recently stumbled upon fabric paint--fabulous, easy, quick!  
(The quicker and easier, the better, yes?) 


Supplies
--stencils
--fabric paint
--small brush
--onesies or t-shirts


Start by putting a piece of cardboard or anything flat & weighted under the top piece of the onesie.  This will give you a nice, flat surface.


Here are the stencils we chose--this was for baby Coleman so we had to encourage soccer, yes?


Place your stencil on the onesie. 
(We used a stencil with adhesive but you could just as easily go the freezer paper route.)


Pull your stencil away from the onesie.  
We did this right after painting; we did not wait for it to dry.


Seriously--remember when we said quick?  We meant it.


Maybe he'll be into hoops?


Or perhaps baseball?


Either way, he'll be precious in his new onesies!

March 15, 2011

::TUTORIAL::Bib Necklace with Vintage Jewelry

I'm going to be absolutely shameless in bragging about this one.
Look at what we made from vintage jewelry:

Want to make one? It's so easy. Here goes.


Supplies:
-vintage jewelry
-jewelry cutter
-felt
-glue gun
-chain


Start by laying out all of your vintage jewelry. I had some yellow and white metal flower pins that I picked up at garage sales but never wore. I wanted to go with a monochrome yellow theme so I did some searching on Etsy for a "lot" of vintage jewelry. I was so psyched to find ClassicStyleSupplies. Love, LOVE, lOvE this shop!! They sell lots of vintage jewelry by color. So perfect for this project!


Hmmm....an off-white OR black background?!
We chose off-white. We felt (excuse the pun!) that it showed off the vibrant yellow color better.


Next, use your jewelry cutter tp cut off any unnecessary backings, pins, etc. from the jewelry. Basically you want to give all of your pieces a flat back that will make gluing onto the felt easier.


Put your pieces on the felt and move things around until you like the placement. (This is where a glass of wine would be nice--you could spend a LOT of TIME playing around with this part.) We played around with the pieces for a bit & settled on an off-center, asymmetrical design.


Here goes 'nothin! Glue your pieces into place (admiring your work as you go and giggling because you can't wait to wear your new baubles).


Doesn't this look sweet?


Hold up your jewelry-glued-on-felt and see where you want it to lay on your chest.
(It was super helpful to have 2 people working on this; one to hold the necklace where she wanted it to lay & then one to measure and cut the chain to the appropriate length.)


Cut around the edge of the necklace...as closely as you can get to the jewelry. A small pair of scissors would be excellent here.
(a word of advice...do this before drinking your wine!)

Now glue the chain to the back of the felt and.....

Voila!